Share
Pin
Tweet
Send
Share
Send
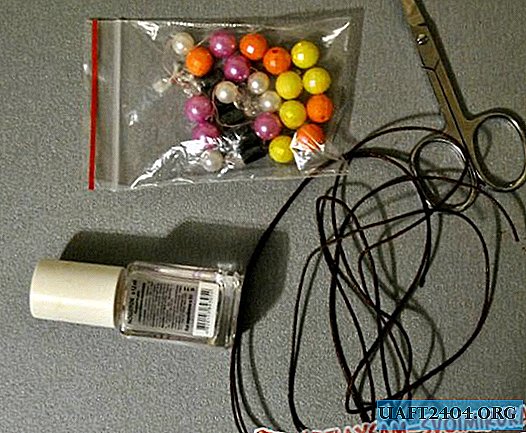
In order to get started, you need to buy:
- smooth cord;
- beautiful beads of medium size (you can even use precious stones, most importantly, the hole in the beads should not be small so that you can thread the cord into it);
- Moment glue or colorless varnish;
- sharp scissors.
Getting to the manufacture of the bracelet.
1. Tighten three cord cuts (50 cm each) into a weak knot, leaving a free tail of at least 5 cm. Do not tighten the main knot so that you can untie it without any problems. As shown in the photo.

2. Getting started tying knots. The first part of the knot: we take the left cord and put it on top of the middle, and then the right cord is used. We put it on top of the cord that was on the left, draw it under the middle cord and pull it out between the left and middle. Now tighten the first part of the assembly. To do this, pull the right and left cord in different directions (the middle one remains motionless). The following construction has turned out.


3. The second part of the knot is tied according to the "vice versa" technique. Now we draw the extreme cord on the left side (it was right at the previous stage) under the central cord. Now we take the rightmost cord and draw it under the left one and put it on top of the central cord. After that, we wind it right through to the loop that formed between the middle and leftmost cords. Tighten the second part of the node. Here is the result.


4. Now we knit such knots in a row. Their number individually for each jewelry is usually enough 4 knots as in the photo.

5. String the first bead on the middle cord and tighten it with the knots described earlier. The only difference is that the cord will surround the bead on both sides, as shown in the photo.

6. We make a couple more knots and again we put on the next bead. We fix it with knots.

7. Repeat this process until the bracelet is the desired length. At this point, we stop adding beads and finish weaving the bracelet with four more knots. We fix the final result. To do this, turn the bracelet over and tie a regular knot from the wrong side and fix it with glue or transparent varnish. Then we cut off the tails. That's what we got.

8. We perform the same procedure on the second side of the bracelet.

9. After the main work is done, the bracelet is almost ready. Garnish its ends with matching smaller beads. Beads are strung on the remaining parts of the cord from the right and left sides, and knots are tied at the ends of the cord so that the beads do not slip.

10. I prefer to fasten such a bracelet on my hand with the help of a lock-shuttle. In general, its weaving repeats all the same knots. We take a bracelet for free ponytails (as in the photo).

11. Next, fasten the cord 30 cm in size, as shown in the photo.

12. Then weave 4-5 knots and finish the work in the same way as we did before. This is what happened to me.

13. It is very important !!! When weaving a lock, do not allow glue to get on the bracelet cord. Otherwise, the lock will simply stick to it and will not "ride".
Everything is ready. Here in the photo two of my creations are completely different, but made on the same principle.

Try it and find your style. Good luck
Share
Pin
Tweet
Send
Share
Send