Share
Pin
Tweet
Send
Share
Send
For almost a year now, I began to replace all the lamps in the house with LED ones. The results pleased sometimes more, sometimes less, but one case led me to an interesting solution.
The reason why I took on the LED lamp

How often do you or someone from your family accidentally knock over a table lamp? Speaking of me, quite a few times ... Therefore, when my child once again dropped my table lamp with the innocent "Oh!", I said: "Enough!"
Warning! Fluorescent lamps use mercury, which is very toxic.
If you accidentally or deliberately break such a lamp, it is recommended to ventilate the room well to save it from toxic fumes.
I decided to replace the fluorescent lamp of my desk lamp with something more shockproof ...
My lamp must withstand the handling of a 10-year-old child, and at the same time emit enough light for convenient work at the desk, work stably and cost inexpensively. A couple of years ago, this problem did not have a simple solution, but now the answer is obvious - this is an LED lamp.
Materials


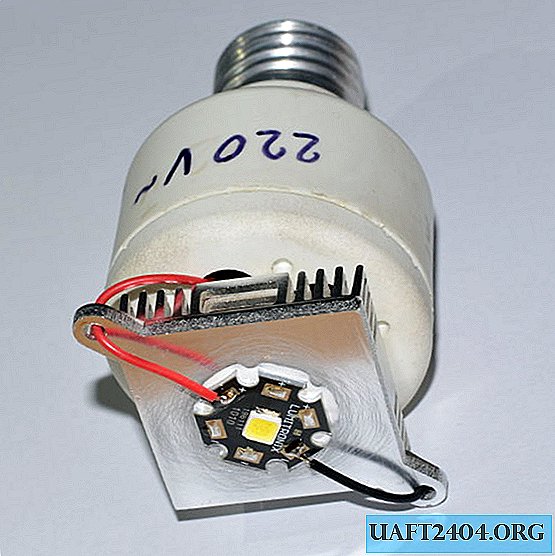
I decided to use Cree MX6 Q5 LEDs with a maximum luminous flux of 278 lm, which remained with me from the last project. The LED will be placed on a 5 x 5 cm cooling radiator that was removed from an old PC.
For simplicity, I decided to use a pulse charger for the phone, which will provide voltage and amperage sufficient for the LED lamp to work. For this purpose, I used a non-working Siemens A52 charger, with a declared output of 5 V and a current of 420 mA.
The cartridge of the old fluorescent lamp will serve to protect the electronics.
Measurements
According to the factory specifications, the Cree MX6 Q5 can be powered by a source with a maximum current of 1 A and a voltage of 4.1 V. I figured that I would need a resistor with a resistance of 1 Ohm to reduce the voltage by 1 V (from 5 V that the power source supplied ) up to 4.1 V consumed by the LED, if only the power supply can withstand a current of 1 A.
To check the maximum allowable current strength that the power supply can withstand, I connected various resistors to its terminals, in each case measuring the voltage and calculating the current strength.
I was surprised to find that the power supply is designed in such a way as to limit the current strength at the level of 0.6 A, with which it normally copes. Carrying out studies in this way with other telephone chargers, I learned that all of them have a current limit of 20% to 50% higher than what was stated by the manufacturer. This makes sense, since each manufacturer designs the power supply so that it does not get too hot, even if the power supply is broken, including from a short circuit. And the easiest way to ensure this is to limit the current strength.
Thus, I had a direct current generator with a current limitation of up to 0.6 A, very efficient (the power supply of the mobile phone is not very hot during use), powered directly from the 220 V AC source, manufactured at the factory and very small in size . And it’s just perfect.
Lamp making


To begin, I took apart the power supply to remove the insides and insert them into a new lamp. Since most power supplies are glued during assembly, I used a hacksaw blade to open it.
In order for the board to fit in the lamp base, some adjustments had to be made.
To fix the board inside the cartridge, I used a silicone sealant, which remains very resistant at high temperatures. Before closing the base, I attached a heat sink (with a screw) to its cover, on which the LED was fixed.
Result: table lamp


Here is the lamp assembly. Energy consumption does not exceed 2.5 W, and lighting is 190 lm, ideal for an economical and reliable table lamp. And all this in an hour of operation, with the exception of the hardening of the silicone sealant and the drying of the hot glue, which was used to fix the LED on the cooling radiator.
I was so encouraged by the success and simplicity of the project that a few hours later, I already had another lamp.
Result: Hallway


Impressed by the results, in the same way I continued to replace several fluorescent lamps in my apartment. I will present them, dwelling on only some details.
For the luminaire in the hallway, I used two Cree MX6 Q5 elements with an energy consumption of 3 W and a maximum luminous flux of 278 lm. Each is powered by an old Samsung mobile phone charger. Despite the fact that the manufacturer declared a current strength of 0.7 A, I found by measurements that the limitation was set to 0.75 A.
Everything is fixed with a textile fastener (Velcro), glue and plastic mounts for the motherboard.
The total energy consumption of the structure is 6 W with a luminous flux of 460 lm.
Result: bathroom


For the bathroom, I made a lamp from Cree XM-L T6, which was powered by two chargers for the LG mobile phone. According to the factory specifications, it can produce a current of 0.9 A, but in practice I have established that it is limited to 1 A. Two units are connected in parallel for a total current of 2 A.
Such a lamp will consume 6 watts of energy and provide lighting of 700 lm.
Result: kitchen


If in the case of the hallway and the bathroom, the provision of minimal lighting was not too significant, then the story is different with the kitchen. I didn’t want my wife or anyone else to cut his finger while cooking and blame me, or, worse, my beloved LED lamps ...
To ensure good lighting of the kitchen, I decided to use not one, but two Cree XM-L T6 elements, with an energy consumption of 9 W each and a luminous flux of 910 lm. As a heat sink element, I used a cooling radiator from a Pentium III microprocessor, to which I attached two LEDs with hot glue.
Although the Cree XM-L T6 can operate at a maximum current of 3 A, the manufacturer recommends using 2 A for stable operation, at which the LED will emit about 700 lm. Testing of several power supplies showed that the current in them is either not limited, or the limit exceeds the required 2 A. I managed to find a power source that, based on the technical characteristics, gives 12 V at a current of 1.5 A. After checking with resistors, it turned out that the current strength is limited to 1.8 A, which is very close to the desired 2 A. Great!
To insulate the radiator and the two LEDs, I used two neodymium magnets from an inoperative DVD drive and plastic mounts for the motherboard. Everything is fixed with glue and Velcro.
Although I expected that such a lamp would produce a luminous flux of 1300 lm, like the 23 W fluorescent lamp that it replaced, I was pleasantly surprised to find that the light produced by the new lamp was significantly brighter, and the energy consumption was 12 W - almost half as much.
Conclusion
The coolest part of this project is that it can be implemented using objects that, with the exception of LEDs, almost everyone has at hand.
Thus, it is possible to get an LED lamp at a price of half or even four times lower than the cost of an LED lamp in a store.
I hope that now the old chargers for mobile phones will be useful again, and not fall into the trash.
Thanks for your attention!
Original article in English
Share
Pin
Tweet
Send
Share
Send