Share
Pin
Tweet
Send
Share
Send
An old table, loose and shriveled, and besides, creaky, like an ungreased cart, itching hands to send to a fire or to a dump. But if you work on it a little, you can get a very good furniture accessory, such as a coffee table (if you shorten the legs to a certain length), or a table for a TV. In my barn lay on the shelf, forgotten by all, the usual kitchen table. In disassembled condition. Four legs with bolts, a wooden base fastened with metal brackets, and three fragments of the countertop.

Having examined this rarity, at first I decided to send it to the garbage truck; fragments of a countertop made of chipboard, from swelling, have swollen under the influence of moisture, and after drying, of course, they have not returned to their original form. Moreover, besides, they became fragile and sawdust sprinkled from them, from which they, in fact, were made ...

The wooden base, on the contrary, shrank to the point that it walked with a shaker, as if alive, it was worth picking it up! After thinking a bit, I decided, nevertheless, to try to "reanimate" him. One way or another, I won’t lose much in case of failure.
Will need
- Hacksaw.
- Gas wrench or pliers.
- Universal glue (you can "Moment").
- Composite glue (cold welding).
- Glue cyan acrylate (super glue).
- Marker.
- Drill and drill on 4 and 9.
- Long ruler (or level with ruler marking).
- Four thick furniture screws under the hexagon.
- A small sheet of chipboard for a new countertop.
- Decorative self-adhesive film for cladding countertops (with a picture of your choice).
Restoring an old table
First you need to disassemble the wooden base. Unscrew all available screws, remove metal brackets.

Our table will be half the size of the previous one, which means that the crossbars that used to be the width of the table will now become its length.

The width of the new table can be chosen independently, to your taste. You can make it even square! To do this, take the remaining long crossbars, and shorten them to the width of the future table you need.

Just expect the width of the future table to be at least half its length, otherwise it will be unstable! Now, on the sawn-off ends of the crossbars, make a hacksaw for the grooves for metal staples, as it was before.


Next, we will deal with the holes remaining from the screws after disassembling the table. Most of these holes will again be in their original places, and in order to keep the screws holding metal brackets well in them, we will use matches and universal glue. Dip the match into the glue (or drip the glue into the hole), push it all the way into the hole, and break off.


The result was a kind of cap-chip. Now the screw will hold well in this hole, and the table will not stagger. Well, so that the "new" table does not creak - drip a drop of engine oil at the contact points of all the individual fragments of the table, both wooden and metal. Now let's take care of the legs. If the threaded connection is unscrewed from these legs, it is advisable to unscrew it from the leg. Coat the threads with composite or universal glue and screw them back in.

All the way. If the connection hangs, but does not twist (it happens when the threaded pin has a “T” -shaped end inside the leg), then you will have to use cyan acrylate (super glue). We drop it into the gap between the joint and the wood until it stops going inside. Leave the glued legs to dry. For a couple of hours, so that composite glue could grasp. (By the way, legs can also be shortened to the height you need, planed, narrowed down if they are square, and covered with stain.) During this time, you can assemble a wooden base; we fasten the prepared crossbars using brackets and screws.

After the time allotted for the hardening of the composite adhesive, we fasten the legs to the base. As before to the old table.

Now we take the prepared chipboard sheet (I took the end wall from the old cabinet for this purpose), cut out the tabletop of the required area and sand it off with sandpaper or a file on the wood, sawn off the edges.

We put the countertop on a flat surface, with the front (most smooth!) Side down. We put the base on top of the countertop, legs up and mark the corners of the legs with a marker.

We remove the base and drill holes 4 mm in each corner, so that the holes are in the centers of the legs. Now we put the base on the legs, put the countertop on it, and look from the bottom so that the marks made earlier by the marker converge. Now, using the holes available in the countertop, we drill holes further - inside the legs, to the length of the screw.

Well, with a drill of eight millimeters, we will make small recesses-pota on top of the holes, for the heads of the screws and screw the screws.


We cover the screw head with composite glue so that the countertop has a flat surface. You can pre-lubricate the surface of the recess, and the screw head in it, with machine oil, then it will be possible to dig out these corks without difficulty in order to dismantle the table, if necessary.

We wait until the composite glue dries and, finally, glue the tabletop with adhesive decorative film.

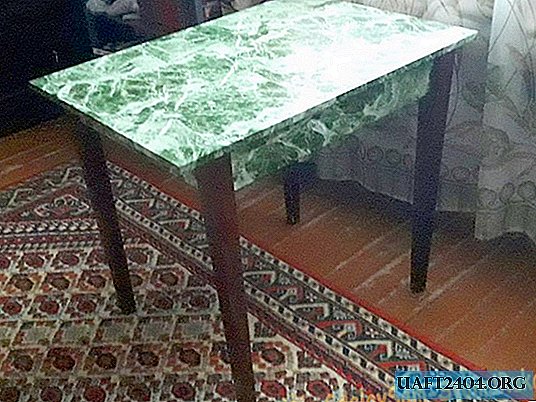
Tape furniture with self-adhesive wallpaper should be as neat as possible; there will be no second chance to re-stick. To do this, I had to dismantle the table (fortunately, it doesn’t take long - unscrew four screws and unscrew four nuts!). I humidified the air in the room with a spray gun, so that the dust particles would not lie on the surface to be glued, and not form bumps and bubbles after the work done. He wiped the surface with alcohol, and carefully, starting from one of the corners, smoothing the film in different directions from the corner with a dry cloth, glued the film in turn on each part. If you still couldn’t avoid the bubbles, pierce them with a thin needle in several places, put a regular kitchen napkin on the bubble and put a mug with a flat bottom filled with boiling water in this place. For one or two minutes. After this procedure, the bubble will disappear. And one moment; having glued the countertop, I changed my mind about hiding the hats of the screws - I really liked the way the shiny metal hats recessed in the “stone” texture look.

But this is each individual case. If someone doesn’t like it, you can hide the hats. Also cover them with glue and stick on top the spots cut out of the same film ... This was the table (in size!):

And so it became - small and compact:

He will fit well into the interior of a small room in a country house. In my opinion, it turned out pretty well. Even very good!
Share
Pin
Tweet
Send
Share
Send