Using a home-made USB-drill, you can make various models and blanks for "home" crafts from polystyrene and polystyrene, as well as other lightweight materials that are easy to cut. Distinctive features of this mini-tool are compactness and versatility.

As a power source, different chargers with a USB connector and a voltage of 5V can be used. It is also worth noting that this device is simple in design, due to which a USB-drill can be made with your own hands at home without any problems.
The main stages of work
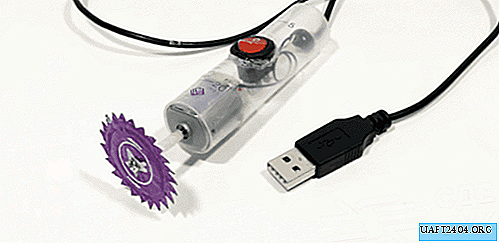
To make a body of a homemade drill, you need a 20 ml medical syringe - we take out the piston and cut off the nozzle for the needle. Then, using a soldering iron (or hot wire), we burn holes in the body.

Next, we cut off the excess wires from the USB cable (we leave only two power cores), after which we fix the wire inside the syringe body. We also insert a small DC motor for 3-5V and an on / off button inside the case.

The cutting disc for the USB-drill can be made of a metal cap from a glass bottle. In the center of the lid we make a small hole, after which we level the plane with a hammer. Cutting cutting teeth with scissors.

We connect the "saw" disk with a piece of plastic rod from the handle, and fix it with a screw. Then we attach the cutting element to the motor shaft.

Now the USB drill is fully assembled and ready to go. The step-by-step process of manufacturing this homemade product can be seen in the video on the site.